1. REST
Representational State Transfer 분산 네트워크 프로그래밍의 아키텍처 스타일
- API : 데이터와 기능의 집합 , 이를 통해 데이터와 기능을 사용자들이 사용할 수 있게 함
- REST API : API 구조가 REST 요건에 부합하는 경우 RESTful하다고 말함
1.1 REST의 특징
- 클라이언트 서버 클라이언트 서버가 각각 독립적
- 상태 없음 클라이언트 서버간 통신시 상태 없음, 서버가 클라이언트 상태 기억할 필요 없음
- 레이어드 아키텍처 서브 클라이언트 사이에 다 계층 형태로 레이아 추가, 수정, 제거 가능
- 캐시 캐시 있을 수도 있고 없을수도 있는데 있다면 클라이언트가 응답 재사용 할 수 있음. 서버 부하 낮춰서 성능 개선
- 코드 온 디맨스 요청이 오면 코드를 줌 특정 시점에 서버가 특정 기능을 수행하는 스크립트 또는 플러그인을 전달해서 기능이 동작
- 통합 인터페이스 일관된 인터페이스 사용해서 소통
1.2 REST 인터페이스 규칙
- 리소스 식별 웹 상에서 자원을 구별하기 위해 고유 식별자로 URI를 가짐
- 표현을 통한 리소스 처리 json, html, xml로 표현
- 자기 묘사 메시지 HTTP 헤더에 보내는 데이터에 대한 메타 정보를 보냄
- 애플리케이션 상태에 대한 하이퍼미디어 링크 정보를 활용한 페이지 이동
(링크에 파라미터를 전달해서 그 값에 맞는 페이지를 보여주는 것 ?)
2. 리소스
REST의 핵심 개념 접근하고 조작할 수 있는 모든 것
- URI : uniform resource identifier, 리소스 식별자
2.1 리소스 표현
- 형식 : xml, html, json 등으로 매우 자유로움 → 웹상에서는 주로 JSON (REST API → JSON)
- 클라이언트에게 전달하기 전 데이터 직렬화해서 해당 시점에 데이터 상태 표현
- 헤더 값 : Accept: text/xml, application/xml, application/json
3. REST API 만들기
- @RestController 사용
3.1 모델 클래스 생성
- 필드, 메소드, 생성자, setter, getter
- example
package info.thecodinglive.model;

import io.swagger.annotations.ApiModel;

@ApiModel
public class Todo {
    private long id;
    private String title;

    public Todo() {
    }

    public Todo(long id, String title) {
        this.id = id;
        this.title = title;
    }

    public long getId() {
        return id;
    }

    public void setId(long id) {
        this.id = id;
    }

    public String getTitle() {
        return title;
    }

    public void setTitle(String title) {
        this.title = title;
    }
}
3.2 컨트롤러 클래스 생성
- example
package ...;

import ...

// REST API 생성하려면 이 어노테이션 필요 -> 바로 결과를 http 응답으로 얻을 수 있음
@RestController
@RestMapping(value= "/example")
public class ExampleController{
		// import java.util.concurrent.atomic;
		// 동시성 처리를 위해 추가한 패키지로 쪼갤 수 없는 클래스임을 명시 -> thread-safe 처리
		private final AtomicLong counter = new AtomicLong();

		@RequestMapping(value="/detail")
		public Example index(){
				// counter.incrementAndGet()을 id 값으로 전달하여 호출할 때마다 1씩 증가
				return new Example(counter.incrementAndGet(), "value");
		}
}
3.3 POST 메소드 맵핑
- 새로운 리소스 생성시 사용하는 메소드
- 응답 보장 X -> 포스트맨으로 결과 확인해야 됨
- example
@RequestMapping(value="/example", method=RequestMethod.POST)
		// RequestParam : 클라이언트에게 파라미터 받아서 SomeValue에 저장
		public Example example(@RequestParam(value="SomeValue") String SomeValue) {
				// param으로 받은 값을 키로 사용
				return new Example(counter.incrementAndGet(), SomeValue);
		}
3.4 응답 헤더 활용
- 클라이언트에게 메타 정보로 활용 가능
- 응답 헤더에 대한 구현체 → ResponseEntity 클래스
- HttpEntity 상속
- Http 응답에 대한 상태 값 표현
- example
@RequesMapping(value="/example", method=RequestMethod.POST)
		public ResponseEntity<Example> postResponseEntity(@RequestParam(value="someValue") String SomeValue) {
				return new ResponseEntity(new Example(counter,incrementAndGet(), SomeValue), HttpStatus.CREATED);
		}
3.5 URI 템플릿 활용
- PathVariable : URI 경로에 변수를 넣어 사용하는 것
@RequestMapping(value="/example/{pathVar}", method=RequestMethod.GET)
		// 입력 받은 pathVar를 URI로 사용 + 어노테이션
		public Example getPath(@PathVariable datatype pathVar){
				Example ex1 = new Example(1, "value");
				Example ex2 = new Example(2, "valuue");
				Example ex3 = new Example(3, "valuuue");

				// Map<순번을 사용할 데이터타입, 저장할 데이터 타입> mapName
				Map<datatype, Example> exampleMap = new HashMap<>();
				exampleMap.put(1. ex1);
				exampleMap.put(2. ex2);
				exampleMap.put(3. ex3);

				// HashMap이 가진 get 메소드로 파라미터 입력 받아서 요소 중 하나를 반환
				return exampleMap.get(pathVar);
		}
3.6 HATEOAS 자기주소정보 표현
Hypermedia As The Engine Of Application State 클라이언트가 파라미터와 함께 보낸 요청에 대한 결과를 얻을 수 있는 전체 URI를 반환할 수 있는 정보 제공
<!-- https://mvnrepository.com/artifact/org.springframework.hateoas/spring-hateoas -->
<dependency>
    <groupId>org.springframework.hateoas</groupId>
    <artifactId>spring-hateoas</artifactId>
    <version>1.3.0</version>
</dependency>
- ResourceSupport 클래스
import org.springframework.hateoas.ResourceSupport;
- 모델클래스가 ResourceSupport 클래스를 상속하도록 함
public class ExampleResource extends ResourceSupport{
		...
}
- 컨트롤러 클래스 수정 → 요청 받으면 모델 클래스 인스턴스를 반환해서 URI 정보를 함께 표시할 수 있도록 사용하는 메소드 추가
- 클라이언트에서 응답 결과를 통해 "_link" 키 값에서 실제 리소스 위치 확인 가능
@RequestMapping(value="/example", method=RequestMethod.GET)
		public ResponseEntity<ExampleResource> geth(@RequestParam(value="SomeValue") String SomeValue) {
				// RequestParam으로 받은 파라미터를 전달하며 모델 인스턴스 생성
				ExampleResource exampleresource = new ExampleResource(SomeValue);
				// 컨트롤러의 geth 메소드로 link
				// withSelfRel 메소드 : url 정보 만들기
				// 해당 정보를 add 메ㄹ소드로 추가
				exampleresource.add(linkTo(methodOn(ExampleController.class).geth(SomeValue)).withSelfRel());
			return new ResponseEntity(exampleresource, HttpStatus.OK);
		}
3.7 REST API 문서화
swagger를 이용한 API 문서 생성 자동화
- swagger 설정 및 라이브러리 추가
API Documentation & Design Tools for Teams | Swagger
swagger.io
<!-- https://mvnrepository.com/artifact/io.springfox/springfox-swagger2 -->
<dependency>
    <groupId>io.springfox</groupId>
    <artifactId>springfox-swagger2</artifactId>
    <version>3.0.0</version>
</dependency>

<!-- https://mvnrepository.com/artifact/io.springfox/springfox-swagger-ui -->
<dependency>
    <groupId>io.springfox</groupId>
    <artifactId>springfox-swagger-ui</artifactId>
    <version>3.0.0</version>
</dependency>
- Config 패키지에 SwaggerConfig 클래스 생성
package ....comfig;

import ...

@Configuration
// swagger 사용을 위해 추가해야 하는 어노테이션
@EnableSwagger2
public class SwaggerConfig {
		@Bean
		public UiConfiguration uiConfig() {
				// 기본 ui 사용
				return UiConfiguration.DEFAULT;
		}
		// REST API에 대한 기본 정보
		private ApiInfo metadata() {
				return new ApiInfoBuilder()
								.title("seungyoon")
								.description("API example")
								.version("1.0")
								.build();
		}
		@Bean
		public Docket api() {
				return new Docket(DocumentType.SWAGGER_2)
								.select()
								// 문서가 참조할 API 경로
								.apis(RequestHandlerSelectors.any())
								.paths(PathSelectors.any()) // 이렇게 하면 자동 로딩하고 있는 컨트롤러도 모두 포함된
								.paths(regex("/basic/.*")) // 인식할 컨트롤러만 설정 가능
								.build()
								// 위에서 생성한 메타 정보를 바탕으로
								.apiInfo(metadata());
		}
}
- swagger 사용법 더보기
swagger-api/swagger-core
Examples and server integrations for generating the Swagger API Specification, which enables easy access to your REST API - swagger-api/swagger-core
github.com
4. REST 클라이언트 개발
4.1 RestTemplate
스프링 프레임워크에서 REST 서버와 연동하기 위해 제공하는 템플릿
- 스프링 MVC 라이브러리에 포함된 클래스
- 스프링 3.2 이상부터 사용 가능
- HTTP 요청을 보내고, 응답에 JSON 데이터를 파싱하고 모델 객체와 맵핑하는 것을 도움
- 메시지 컨버터로 JSON respone → Map, Model 클래스로 변환 가능
<!-- https://mvnrepository.com/artifact/org.apache.httpcomponents/httpclient -->
<dependency>
    <groupId>org.apache.httpcomponents</groupId>
    <artifactId>httpclient</artifactId>
    <version>4.5.13</version>
</dependency>
4.2 UriComponentBuilder
- UriComponentBuilder 생성자의 접근제한자가 protected이기 때문에 newInstance() 메소드로 접근해야 함
																	// 프로토콜 정보
UriComponentBuilder.newInstance().schema("http")
								.host("movie.naver.com")
								// 특정 포트넘버 사용하는 경우 입력
								.port(80)
								.path("/movie/bi/mi/basib.nhn")
								// path - build 사이에 파라미터 추가 가능 , 여러개 사용할 경우 queryParam을 여러개 사용
								.queryParam("code", 146506)
								.build()
								.encode()
								.toUri();
- PathVariable이 포함된 url 만들기
UriComponentBuilder.newInstance().schema("http")
								.host("test.book.com")
								// 특정 포트넘버 사용하는 경우 입력
								.port(80)
								.path("/book/{bookId}")
								.build().expand(bookId)
								.encode()
								.toUri();
4.3 HTTP 메소드별 RestTemplate 메소드 명세
RestTemplate는 API 서버의 HTTP 호출 방식과 반환 타입에 적합한 메소드 지원
- GET
- getForObject : 객체 반환
- getForEntity : HttpResponseEntity 반환
- POST
- postForObject
- postForEntity
- DELETE
- delete : 반환 없음
- PUT
- put : 반환 없음
- 사용자 지정
- exchange : 반환도 사용자 지정 → 파라미터 요청 방식 결정 가능
5. REST 관련 요소 심화
5.1 RestController
- 스프링 4.0 버전 이상부터 사용 가능
- @Controller + @ResponseBody
- RestContoller 어노테이션을 붙인 컨트롤러 클래스 하위 메소드에 @Responsebody 어노테이션 없이 문자열, JSON 전송 가능
- @Controller만 하면 Responsebody 없이 문자열, Map 반환 불가
5.2 RestTemplate
- 스프링 3.0 버전 이상부터 지원
- RESTful 하게 HTTP 통신을 통해 json, xml 응답을 쉽게 받을 수 있음
- 동기 방식의 REST Client : REST API 호출 이후 응답을 받을 때까지 기다림
- import org.springframework.http.client.restTemplate;
- HTTPClient : HTTP를 사용하여 통신하는 범용 라이브러리 → RestTemplate가 HttpClient를 추상화해서 제공
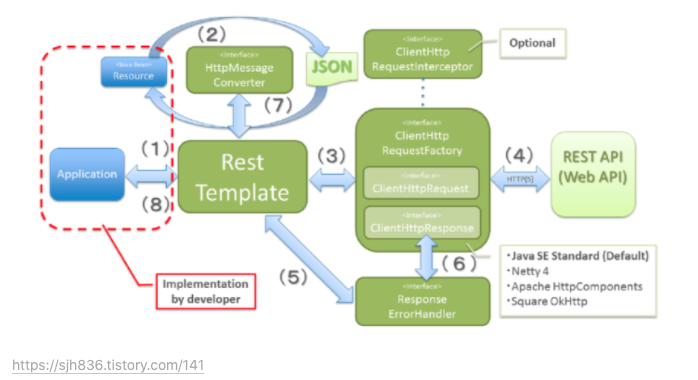
- 애플리케이션이 API호출 동기 처리를 위해 RestTemplate 생성, URI HTTPmethod 등의 헤더를 담아 요청
- HttpMessageConverter를 사용하여 requestEntity를 요청 메시지로 변환 (JSON)
- ClientHttpRequestFactory로부터 ClientHttpRequest를 가져와 요청을 보냄
- ClientHttpRequest는 요청 메시지를 만들어 HTTP 프로토콜을 통해 서버와 통신
- ResponseErrorHandler로 오류를 확인하고 있다면 처리 로직을 태움
- ResponseErrorHandler는 오류가 있다면 ClientHttpResponse에서 응답 데이터를 가져와 처리
- RestTemplate는 HttpMessageConverrter를 이용해서 응답메시지를 java object로 변환
- 애플리케이션에 반환됨
5.3 UriComponentBuilder
- 컨트롤러에서 addAttribute로 하나하나 속성을 지정해주지 않고 파라미터를 전달하여 간단히 URI를 만들 수 있게 하는 클래스
- example
// 출처: https://2ham-s.tistory.com/276

UriComponentsBuilder builder = UriComponentsBuilder.fromPath("")
					.queryParam("pageNum", this.pageNum)
					.queryParam("amount", this.getAmount())
					.queryParam("type",this.getType())
					.queryParam("keyword",this.getKeyword());
- queryParam으로 필요한 파라미터 추가
- example2
// 출처 : https://www.hanumoka.net/2018/08/10/spring-20180810-spring-UriComponentsBuilder/
UriComponents uriComponents = UriComponentsBuilder.newInstance()
				.path("/{a}/{b}/{c}")
				.queryParam("bno", 12)
				.queryParam("perPageNum", 20)
				.build()
				.expand("samplehome", "board", "read")
				.encode();

...uriComponents.toString()...
5.4 ResponseEntity
- 컨트롤러의 반환값이 객체인 경우 사용할 수 있는 클래스
- HttpEnity 클래스 = request 또는 response의 HttpHeader + HttpBody
- HttpEntity를 상속받아 구현한 클래스 = RequestEntity, ResponseEntity
- ResponseEntity : 사용자의 HttpRequest에 대한 응답 데이터를 포함하는 클래스 = HttpStatus + HttpHeaders + HttpBody
- ResponseEntity 의 생성자는 body, header, status를 파라미터로 받는다.
References
- 스프링 부트로 배우는 자바 웹 개발 (윤석진) 기술서를 참고하여 정리한 내용입니다.
'웹 개발 > Spring Boot' 카테고리의 다른 글
| Spring Boot) vscode에서 gradle로 jar 파일 빌드해서 실행시키기 (0) | 2021.06.02 |
|---|---|
| Spring Boot) 현재 페이지의 URL주소 가져오기 (0) | 2021.06.02 |
| Spring Boot) 4. 스프링 부트 웹 개발 (2) | 2021.04.28 |
| Spring boot) 3. 스프링 프레임워크 (0) | 2021.04.28 |
| Spring Boot) 2. 서블릿 Servlet (0) | 2021.04.28 |
